A Lenticular Journey :: An Endless Loop on show
 Monday, September 3, 2012 at 4:31PM
 I have been on an interesting little journey over the past few months - dipping my feet into the murky waters of lenticular imaging. This is something I have wanted to try or a few years but when I first looked into it and invested in a lenticular kit from 3dphotopro.com, I was REALLY disappointed. The booklet was incomprehensible, the software was a real killer for an amateur, and I just found myself emailing trails of questions to the developer, with equally incomprehensible responses. I blame myself for the experience - I think I bit off more than I could chew and needed a more nurturing introduction to the world of lenticular. So I wrote off my investment and started fresh recently, taking the small steps approach (but with a high pressure outcome, as I tend to do)..
STEP ONE
I looked into ways of capturing the multiple images required, and decided that the camera array I used for my Human locomotion Project was just too ambitious and too expensive for this kind of work. I decided on the Stage Zero dolly system from Dynamic Perception - designed for timelapse (this will be handy for my next project) but adapted for lenticular by using the controller in the "shoot move shoot" mode. Brilliant. This was perfect for the job and after some experimenting in the studio with my able assistant Nick, we had that figured.
http://dynamicperception.com/products/stage-zero-ultimate-bundle
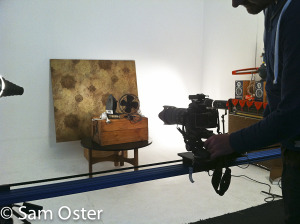
We tried to use the Multistereobase software to calculate the distance between frames and muddled our way through the settings to create a pretty good outcome. I posted the outcome (as a video file) on a great 3D photo forum I found at www.3dphoto.net, and got some really good support there. Our first test was shot using flash, but there was not enough consistency in the flash output between frames, so for the rest of the series I chose to use continuous lighting - using theatre spots to generate enough controllable light.
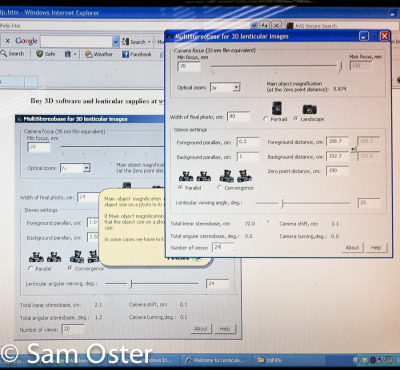
(above) a dodgy phone camera snap of the screen showing the Multistereobase software tinkering.
STEP TWO
Refine the concept for the lenticular series
Well, this was interesting. I set myself up in some ways - I needed to submit my artist statement for the Shimmer Photography Festival a few months before the show, and I still hadn't started shooting - so I committed myself to extending the ideas explored in the show 'Short Circuit' for the Ballarat Foto Biennale 2009. I decided to explore the electrical still-lives I began working with in 2010 (but had never resolved), but this time in 3D. I wanted to use wallpaper backdrops to 'position' the still life in the retro domestic realm, and this proved to be by far the most difficult part of making the work. I asked around for people with wallpaper walls but it turns out most people have removed it and I really struggled to find enough backdrops for me series. In fact I ended up making my own backdrop for one of the pieces. If I had the luxury of time to produce this series (or even a budget!) I would have made more backdrops myself and shot in the studio - it was really tricky to invade people's homes to create this work, and I think I compromised the images a fair bit by taking this approach.
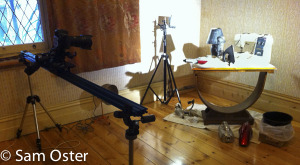
I began collecting my appliances again, scouring dumps and hard rubbish. This is a really fun part of envisioning the work, bringing objects back to life with all their flaws and dysfunction. Some of my favourite objects from my early work managed to make a re-appearance too.
There was a MAJOR impact from the lenticular process on my compositions. It turns out that there's such a thing as "Window Violation" in 3D and although apparently lenticular is reasonably forgiving of this violation, I was afraid to cross that line. This meant that I needed to keep the table within all of the frames and capture very wide in anticipation of the eventual aligning and cropping of all the frames that would need to happen in Photoshop. This meant that my compositions could no longer be as spontaneous and instinctive. It was quite difficult to shoot with these restraints.
I also wanted to shoot the arrangements with a layer of TIME over the still-life. My interest in moving-image also affected my decision-making here - I wanted to show time passing by building up layers of 'elements' over the collection of objects, as if they had been left behind...Some of the elements I wanted to work with included ash, water, sand, dust etc...but in the end for this series I decided to work just with sand. I plan to extend this in the next part of the series.

Finally, I used a book I've had for many years "Audels Handy Book of Practical Electricity - with wiring diagrams" in all of the compositions. You can't always see the text but I liked the idea of including the book as a reference to practical electricity and as an expression of my own curiosity about how things work. I like the bizarre quality of the text book amongst the familiar, everyday objects in the arrangements.
STEP THREE
Capturing for lenticular
OK, basically it's about capturing multiple perspectives of the same scene. The number of frames used can vary but a minimum is around 6 - my printer wanted me to provide 12 frames. I shot a MUCH wider range though, with moving image outcomes in mind. There is a range of software out there to help you figure out the step distance between the frames. The forum community recommended Triaxes Stereometer, which I used for most of my calculations. The elements that have a big impact on the distance are:
- focal length
- distance to foreground
- distance to zero parallax
- distance to background
- number of frames
- print size & viewing distance
There are also basic rules and formulae. Triaxes notes suggest that in calculating the stereobase (distance between leftmost and rightmost frames) you can use B=0.03xD (distance to closest subject). Or you can just use the 1/20th rule (1/20 x D). Anyway - I shot a much broader range at much smaller intervals than any software or calculated recommendation. This made the post production job much more complex.
STEP FOUR
WORKING WITH THE FRAMES, PREPARING THE FILES
Soooo, having shot hundreds of frames (I used the range captured at 3mm for all of my final pieces, but I shot a few variables) I then needed to calculate which 12 to choose. Working from the centre frame, I had to work out which stereobase I needed based on a different approach (suggested by the printer in Melbourne - the fabulous Bart Kelsey). He said to use the layered and aligned range of files in Photoshop, scale the image to the print size at 100%, and then measure the distance between the 2 extreme frames and make sure that it didn't exceed 30mm for the background, and no more than 15mm in the foreground. Using this method and his feedback on draft frame sets, I had to re-align many of my compositions on a new zero / convergence point to create a more appropriate shift. An example of the results are that I used a 12mm shift step and a 144mm stereobase. Convergence points were approximately 1/3 into the frame as suggested by Bart Kelsey.
The photoshop work was quite simple - I used the scrip to import multipe files into layers, and then changed the opacity of layers amd moved them manually to match the zero points. For the moving image sequences this had to be done on over a hundred frames so it's quite a job, especially on a struggling laptop late at night! Another PS script exported the layers into new files, which were imported into Lightroom, cropped and checked for tonal consistency.
I could never have created this work without the patient support of Bart Kelsey, who basically tutored me through the process once the frames were captured. Also the support of the 3D community forum was utterly invaluable.
FINAL STEPS
Preparing for the exhibition
I was really rushed in producing this work! By the time I found the locations (which distracted me from the serious part of finding the objects and considering the other compositional content like the table surface and relationship between the objects) I had just a couple of weeks to shoot. Bart was really efficient in printing the work but I was delayed in deciding on how to frame the work, and it turned out that the particular moulding I chose was not in stock and had to be ordered from interstate. So the final stages were a bit stressful in trying to ge the work to the gallery on time. I was busy trying to prepare files and create image sequences for the moving image work which was incredibly time consuming but rewarding. I also had custom frames made for the digital Photo Frames (Kogan) I have so that they look really slick on the walls. I was devastated when the gallery director at Greenhill Galleries refused to even consider showing the moving image work (too hard) - but I managed to get them shown in another gallery (Noarlunga Arts Centre) for the festival so at least they are out there. Thanks to Lucy Thurley at the City of Onkaparinga for putting up with my complaints and accommodating me.
The outcomes can be seen on the Endless Loop webpage, or in the Moving Image section of this site...
The exhibition is on at:
Penny's Hill Winery - Willunga Rd McLaren Vale (open 10am - 5pm daily)
September 2 - Nov 6 2012
ARTIST TALK :: Sunday 9 September at 11am

